Veterinary Services
Patient Care
Pet Patient Care in Cary, NC
The initial weeks after surgery will come with new challenges for you and your pet.
The following are guidelines to assist you in their care.
Activity
Always follow the discharge instructions carefully. These are provided to you when you come to pick up your pet and are explained to you by one of our technicians or technician assistants. Make sure you put these instructions in a safe place (such as your fridge!), as this document contains information concerning activity, medications, future re-visits, and more. These instructions are an ongoing source of answers as your pet progresses through the various stages of recovery.
Regarding Activity
The type of surgery and your pet’s specific circumstances will determine the type and amount of allowed activity. The progress during recovery, and the time to full recovery, will vary from pet to pet (even limb to limb). Sometimes your pet will be ready to take on the listed activity as instructed, and other times it may take a bit longer for your pet to reach that point. Please do not push your pet into activity if he/she is not ready. For those pets that think they are ready to take on the world with no need for recovery time, make sure you do not allow this! If they are too active too soon, they may delay or impair their recovery.
Typical Instructions:
- Remember to leash walk at a slow controlled pace.
- Keep off of furniture/beds. No running, jumping, playing with pet pals, etc.
- Keep to the level of activity specified by your doctor. If your pet seems uncomfortable or becomes lame as you increase the duration of activity, return to that comfort level they were at ease with. Over the next week, slowly work back towards that increased activity.
- Some cases of at-home physical therapy can be beneficial to your pet. Range of motion exercises can be completed carefully and correctly by flexing and extending the leg. In other cases, the doctor may recommend you take your pet to a veterinary rehabilitation facility.
Sometimes a ramp is in order to safely maneuver over stairs or for loading up in the car. You can see in these two photos the best way to build a ramp and how to walk with your pet on the ramp.
How To Use:
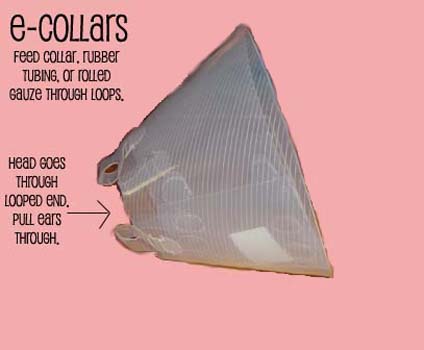
Feed your pet's collar or the material provided by us (a string of gauze or thin plastic tubing) into the 3-4 loops. The head goes through the looped end, making sure you bring the ears into the inside. If you are using something that requires to be tied, make sure you don’t tie it too tight. When tied, if you are able to get a finger or two between the e-collar and your dog's neck, you are fine. If it’s too loose, they may be rotten, and remove it!
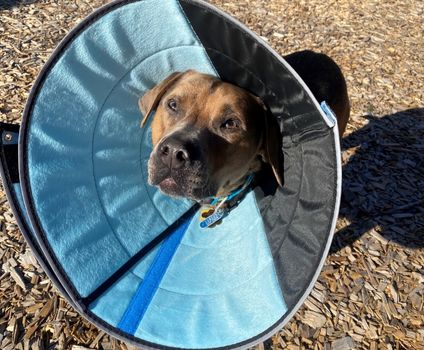
- E-collars are used if your pet likes to chew, lick or play with the incision and/or a bandage. E-collars can be plastic, soft fabric, firm fabric, or inflatable.
- If you are around your pet and carefully watching him/her, you may keep the e-collar off. But it is recommended that you place it on your pet if you are not around, at work, or at night time.
- Your pet may not initially care for the e-collar. This is common. They may try to paw it off, hang their head low, or startle themselves if they happen to run into things (including doorways!) as they move around with it on. It will take some time to get used to, but remember – it is in your pet's interest (and yours as well, since you have spent much time and money on taking care of your pet) to keep the e-collar on when necessary. Your pet will eventually adapt to it.


- Fentanyl belongs to the narcotic group of opiate drugs. It is absorbed through the skin and binds to receptors. We use it to aid in short-term pain control. It may or may not be placed on your pet depending on any of the following factors – the age of your pet, your pet’s weight, the procedure completed, and most likely surgeon’s preference.
- The patch is placed on a clipped area of the skin. The fur is shaved, so the patch may be in direct contact with the skin, allowing maximum absorption. The patch (a clear “sticker” with gel) is then covered with white waterproof tape. The tape is then labeled with the strength of the patch (12.5 mcg, 25 mcg, 50 mcg, 75 mcg, 100 mcg, or a specified combination), the date it was placed, the date it is to be removed, and the initials of the individual who placed it. The patch is to be removed three days after application or sooner if indicated.
- Responses to the fentanyl patch vary from patient to patient. Contact your veterinarian if your pet seems listless, “out-of-it”, depressed, or exhibits other behaviors that may concern you. These may be adverse reactions to the patch, and the doctor may advise you to remove the patch early. Once removed, it may take 8-12 hours for the medication to stop affecting your pet.
- Keep the patch out of reach from children! Contact your veterinarian if your child comes in direct contact with the patch.
- To remove the patch: remember that if you have had a piece of tape on your body for a few days, it might hurt a little when it’s removed. This applies to your pet as well. Therefore, you may need an extra hand when removing the patch. Remove the white wetproof tape gently (it will automatically pull the clear fentanyl patch with it), fold it in half, and throw it away. If you happen to touch the gel yourself, immediately wash your hands. You should not have a reaction to it, but if you do, immediately call your veterinarian as well as your doctor.
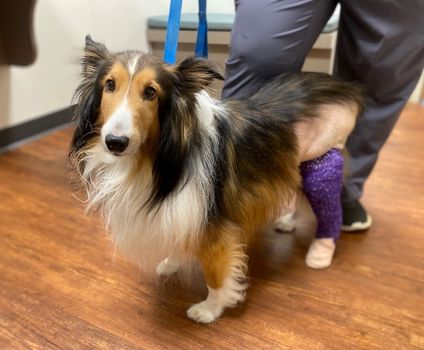
- Please be sure to follow the schedule for when bandages should be replaced and removed. Each bandage will stay on between 7 to 14 days, or otherwise specified by your doctor.
- Keep the bandage covered with a bandage protector. We will send you home with a thick soft plastic bag, but there are other commercially available bandage covers. Use this when the ground is wet because of morning dew or inclement weather. Remember to remove the bag when you come back inside, so the bandage may “Breathe” properly. Keeping it dry and clean is very important!
- Keep an eye on your pet's toes. If the toenails are close together, then they are good! If they appear to be spread apart, they may be swollen. You can compare the bandaged toes to that of the others to get an idea of what they should look like. If they are swollen, you may gently massage the paw if your pet will allow it – sometimes this will help reduce the swelling. If they continue to swell, give us a call, for you may have to have the bandage changed out a little early!
- If your pet decides to lick, chew, or tear up the bandage, a bandage change may be necessary depending on the extent of the damage. If it is not extremely torn up, place an e-collar on your pet until the bandage is removed. Contact us if you feel the bandage needs to be changed.
Care of the bandage is important in protecting the incision and in allowing proper healing of the muscles and bone structures.

Bandage Types
We will use one of the following materials on your pet as incisional patch material. The “tape” is placed over the gauze that is lying on top of the incision:
| Elasticon: tanish-brown tape (Goes over a piece of gauze) |
Bioclusive: clear, saran-wrap-like (Over a piece of gauze) |
- Your pet may or may not be sent home with an incisional patch. Do not be concerned if your pet does not have one. In this case, watch your pet closely, so they do not bother the incisional area.
- The patch is to be removed anywhere from 3-7 days after the surgery date or otherwise specified by the doctor. When removing, it might be a little painful, so you may need an extra hand when taking it off.
- If your pet removes the patch earlier than specified, do not fret. Just be sure to watch your pet more carefully. When you are not around, you may wish to place an e-collar, so they do not disrupt the incision area or remove the sutures/staples.
- Between the time you remove the patch and the time the sutures/staples are to be removed, make sure your pet leaves the site alone. As stated above, the placement of an e-collar may be necessary!
Make sure your doctor is informed of any and all medications your pet is currently taking! Please also make them aware of any additional medical conditions.
- Most pets are sent home with antibiotics and pain meds. Though if your pet does not receive both or any, do not be alarmed. Some procedures do not require the use of medications after they are completed.
- Be sure to follow the go-home instruction section on medications carefully. If the medication bottle instructions conflicts with the discharge information or the dosage the individual discharging your pet indicates, please notify us. Sometimes the doctor changes the doses depending on the patient and/or medication after the discharge instructions are printed.
- Use all of the medication(s) as specified. Some are given for only three days, while others are given for up to a month. Do not stop giving the medication if you feel your pet is doing well enough without them unless the doctor recommends doing so. Your pet requires the entire usage as prescribed.
- DO discontinue the use of medications if your pet seems to be reacting negatively to them. If you notice them acting weird (for example, vomiting or acting neurological) – then stop giving the medication and immediately contact your veterinarian and make us aware of these symptoms.
- Keep out of reach of children.
- Your pet may or may not be sent home with a sling. Typically smaller, low-riding pets are not sent home with the sling. Also, some procedures do not require the aid of a sling.
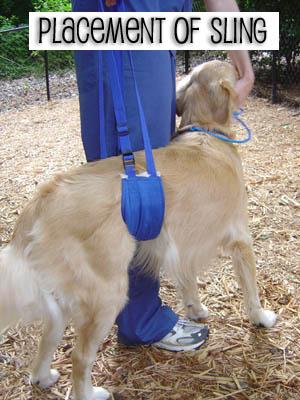
- The sling goes underneath the belly – directly in front of the hind legs. Blue side pointed towards the ground, cushy side to the belly!
- The sling is a safety net, not a wheel-burrowing device! Do not lift your pet's back end up – it is loosely there, so help your pet if he/she happens to slip and fall – you are there to catch him/her.
- Use the sling when going up and down stairs, across slippery floors, to get your pet in and out of vehicles, and get your pet inside and outside. Once outside, you may either slip the sling up towards the chest (to allow stabilization if your pet had either a serious fracture repair / bilateral hind limb work, total hip, or if you just feel safer keeping it there), or you may take it out from underneath them if you are comfortable with their ability to walk around. Allow them to use the bathroom, and immediately replace the sling to its proper position.
- Continue to use the sling as instructed.

When traveling with your pet always use a leash. While your pet is recovering do not use a retractable leash. Your pet needs to be under control at all times while walking beside you.
This video will show you how to successfully unload and load your pet into your car using the sling. It is crucial your pet not be allowed to jump into or out of the car at any time during the recovery period.

